This guide is intended to provide step by step instructions on how to migrate from Small Business Server 2003 to Windows 2008 R2 with Exchange 2010.
For this migration to work you will need the following software:
Steps required:
It’s important that the steps are followed in order as different stages make different changes to the way in which your server operates. For example you MUST make the 2008 server a domain controller before you install Exchange.
The absolute first thing you need to do is take a SYSTEM STATE backup of your Small Business Server as well as a full system backup. There is little chance of the data getting lost but the SYSTEM STATE backup backs up Active Directory so that if it all goes wrong we can recover it if needed.
What you then need to do on the SBS 2003 server is to make sure you have all the latest available updates. This means you should at a minimum have:
Once you have installed all of the above, run Windows Update and make sure you select the option in the blue banner bar across the top for Microsoft Update. Microsoft Update will then allow you to update all Microsoft products installed on the server providing a more comprehensive update solution. Keep running the check and installing all updates until there are no more available.
Check the health of your Active Directory by running DCDIAG, if there is anything reported as an error fix it before moving on.
Run the Small Business Server 2003 Best Practices Analyser from here: http://www.microsoft.com/downloads/details.aspx?familyid=3874527A-DE19-49BB-800F-352F3B6F2922&displaylang=en
Make sure you fix any problems the analyser identifies. If you cannot, then why not raise a question on EE to have our Experts help you?
A common problem that can cause this migration to fail is that the SBS 2003 server does not have its own IP address listed for DNS in the network properties under TCP/IP. If this is the case, update it so that it does (do not use the loopback 127.0.0.1 address).
To join a Windows 2008 Server to the Small Business Server domain we need to first ensure that it is receiving a correct IP Address
Allow the Windows 2008 Server to receive a DHCP Address from your Small Business Server. Run an IPCONFIG /ALL to check this. The DNS Server entry is probably the most important. This should be configured to use the IP Address of your Small Business Server for DNS.
To test, it might be worth just pinging the SBS 2003 server from a command prompt just to check the name can be resolved by doing the following:
If you get a good response then we can try and join the 2008 server to the domain.
To Join the Server to the Domain, do the following:
The first step of this process is to raise the Functional Levels of the SBS 2003 server. This involves raising the domain and forest functional level of Active Directory and the Operational mode of Exchange Server.
To raise the Domain Functional Level do the following:
To raise the Forest Functional Level do the following:
And we also need to raise the Exchange Operational Mode. To do this, you need to do the following:
Before we can add the Windows 2008 Server as a domain controller to the SBS 2003 domain, we need to prepare Active Directory.
To do this use the following procedure whilst working on the Small Business Server
NOTE: X: refers to the drive letter that has been assigned to your DVD Drive. After the above command you will be prompted to confirm you wish to proceed by typing the letter C and pressing Enter
To make the Windows 2008 Server a Domain Controller is fairly straight forward, we simply click Start > Run and type DCPROMO click OK.
This will check that the Active Directory Services Binaries are installed and if they are not, it will install them. It will then start the Active Directory Domain Services Installation Wizard.
On the first screen, there is no need to check the 'Use Advanced mode Installation' check box, just simply click next. On the operating System Compatibility screen click next.
On the 'Choose a Deployment Configuration' screen, select the radio box for Existing Forest and Add a domain controller to an existing domain. Then Click next.
On the 'Network credentials' screen, the name of the domain should have been detected automatically. Check this is correct. If you are logged in as a user that has domain admin privileges then you can use the My Current logged on credentials option. If not, click the set button and add the username and password that has domain admin privileges as shown in the screen above. Click Next.
The following screen will give you the results of a domain search and ask you which domain you want to add this domain controller to. As you are upgrading Small Business Server there should only be one. Click Next.
The next screen will give you an option to select the site for the new domain controller. If you have more than one Active Directory Site ensure that you select the correct one if it hasn’t been done by default. Click next.
On the 'Additional Domain Controller Options' screen, make sure that both the DNS Server and the Global Catalog options are both checked. Click Next. The error message regarding DNS Delegation can safely be ignored. Click Yes on this dialog to continue.
If you have separate folders where you want to store your log files, SYSVOL share and the Active Directory database then these can be specified on the next screen. To be honest I keep them all as defaults. Once done, click Next.
On the following screen, you are asked to set a password for Directory Services Restore Mode Administrator (DSRM). Please note this is NOT the Domain Administrator password. This password is used to boot the Domain Controller into Directory Services Restore Mode which is used for recovering corrupt/deleted/failed Domain Controllers. Make a note of this password and keep it somewhere safe (in a fire safe for example).
Click Next on the following 2 screens. The wizard will then start the promotion of the server to a domain controller (I always check the box on this screen to reboot on completion - This way you can leave it and come back to it knowing that it will be ready to continue).
Once rebooted your new server will be a domain controller, DNS server and Global Catalog server in your Small Business Server Domain.
By default the Small Business Server will be the DHCP Server (if it isn’t and you're using something else for DHCP, then you will simply need to update the DNS configuration this device is giving out so that it points to the 2008 Server instead of the 2003 Server) we will need to transfer this to the new server.
We can start this process by installing the DHCP Service.
To install DHCP, open up Server Manager and under Roles, click Add Role. From the list, select DHCP Server and click Next then next on the Introduction to DHCP Server screen.
On the network Connection Bindings screen you should have your primary IP address listed. As you will be installing Exchange on this server it’s not recommended to have a multi-homed server but if you do make sure the LAN card and IP is the only one selected. Click next.
NOTE: A multi-homed server is a server that has multiple IP addresses assigned to multiple Network Interface Cards. Normally these types of servers would be used as routers. Whilst Exchange can be made to work in this environment, it's not recommended.
On the Specify IPv4 DNS Server Settings check the following settings:
Click next accepting the default settings on the WINS screen.
On the Add or Edit DHCP Scopes screen, click Add. This will present you with the Add Scope dialog box.
On this screen enter the following details:
(This should be the same as the DHCP Scope you have configured on the Small Business Server).
You will notice in the scope I am creating, I have started from 192.168.10.15 this is so that I have 15 addresses that I can assign to fixed addresses. My Small Business Server and Windows 2003 server will have an address below 192.168.10.15 but I might also have printers, photocopiers, and wireless access points that also need fixed IP addresses. I have also left 192.168.10.254 available to use for my router.
Once you have completed all the details, click OK and then Next.
Accept the default setting on the 'Configure DHCPv6 Stateless Mode' and the Specify IPv6 DNS Server Settings.
On the 'Authorize DHCP Server' screen, select to use the current credentials and click Next, then Install on the confirmation screen.
The DHCP Server service is now installed on the Windows 2008 server.
Before we can switch over, we need to make some changes to the Small Business Server DHCP settings. Whilst we can just turn one off and turn the other on this will cause you to have to release and renew the settings on the client machines manually for them to pick up the new DHCP Service. The alternative is to wait the 4 days before your client machines request an IP address renewal.
To make the required changes, do the following on the Small Business Server:
In the section titled 'Lease duration for DHCP clients' we are going to change it to 2 hours from the default of 8 days. Click OK
Then under Address Leases, highlight all DHCP Leases, right click and select delete. NOTE: If you have any reserved addresses make sure they are not highlighted otherwise they will be deleted also.
This action will cause all DHCP clients to renew their addresses and gain an address that has a 2 hour lease. Check the Address Leases and refresh until you are happy that all the clients now have an IP address. (You might want to leave this overnight just to make absolutely sure)
Once you are happy that all the clients have now got a 2 hour lease from the Windows 2008 server do the following:
This will start the DHCP Service on the 2008 server and deactivate the service on the Small Business Server (this will happen automatically because when Small Business Server detects another DHCP server on the network it shuts its own down).
You will now find that in approximately 1 to 2 hours time, all your clients will start picking up IP addresses from the Windows 2008 Server.
You can now disable the DHCP Server service on the Small Business Server. DO NOT disable the DHCP Client service, as this plays a part in DNS registration.
Now that all the clients are using the new Windows 2008 Server for DHCP and DNS, we need to make sure that the Small Business Server is also using the Windows 2008 Server for DNS. To do this modify the TCP/IP properties of the network card and change the Primary DNS servers IP address to that of the Windows 2008 Server. Do not enter anything in the Secondary DNS server.
Once you have done this restart the NETLOGON service so that the DNS entries are added to the Windows 2008 DNS.
Because we performed all the diagnostic checks at the start, the installation of Exchange 2010 should be fairly straight forward. Please note that even though the installation of any version of Exchange Server on a domain controller is supported by Microsoft, it is not a recommended configuration. But since we are migrating from Small Business Server the chances are you still want to stick with a single server configuration.
The first step is to install the pre-requisites on Windows 2008 to allow the Exchange 2010 installation to complete. This can be done very easily using the Windows PowerShell.
To do this, please use the following steps:
Once the PowerShell is opened run the following commands:
There is no notification this has completed you will just see a flashing cursor waiting for input. This command will allow us to add server roles and features via the PowerShell command.
This command will install all the pre-requisites for the Mailbox, Hub Transport and Client Access roles on to the Windows 2008 Server. This will replicate what you currently have on the Small Business Server.
Once the server has restarted after the above command, launch the Windows Powershell again and run the following command:
This will set the Net.Tcp Port Sharing Service to Automatic instead of Manual
Install the Microsoft Office Filter Pack (which you should have downloaded earlier from the top list of required software).
Once we have done this, we need to prepare Active Directory for the Exchange 2010 installation.
Unlike previous versions, Exchange 2010 will detect if the schema updates have been done and do them if not, I prefer to see this happen.
To prepare Active Directory for Exchange 2010 we need to do the following:
Start the Exchange installation from the DVD. On the initial splash screen that opens, click Step 3: Choose Exchange Language Options, select the appropriate option then click Step 4: Install Microsoft Exchange. The Exchange Installation Wizard will then start.
The first screen you see is the Introduction screen, click Next. Read, agree to and accept the license agreement screen.
This screen allows us to choose the type of installation. As it’s assumed the Exchange 2010 server is a direct replacement for Small Business Server and all roles will be installed on a single server, we simply select Typical Exchange Server Installation and Click next.
If we were separating our roles out on to different servers we would select Custom Exchange Server Installation and then click next.
This screen allows us to specify what URL will be used for accessing our Outlook Web App from outside of the network. Whatever you put in here you will need to make sure you have a DNS A record for it in your EXTERNAL DNS server. In the later steps you will also need to use this name in your SSL Certificate Request. (CSR)
Check the box 'The Client Access role server will be internet-facing' and then specify the URL you will use, do not add https:// or anything at the end i.e. /owa. Click next.
This screen is asking us to specify the Exchange 2003 server that the installation will create a routing group connector for. This is essential for mailflow between the servers. Click Browse, the list should be generated automatically and you will be able to select the Small Business Server from the list. Click OK and then next.
Choose on the next screen if you wish to participate in the Customer Improvement program and then click next. At this point the readiness checks will be performed to ensure your infrastructure is ready for Exchange 2010.
The results of the readiness check should show a warning on the Organisation Prerequisites, this is normal and it’s because we didn’t run the setup /PrepareAD /OrganizationName: command earlier on. This can safely be ignored as the setup will perform this task for us.
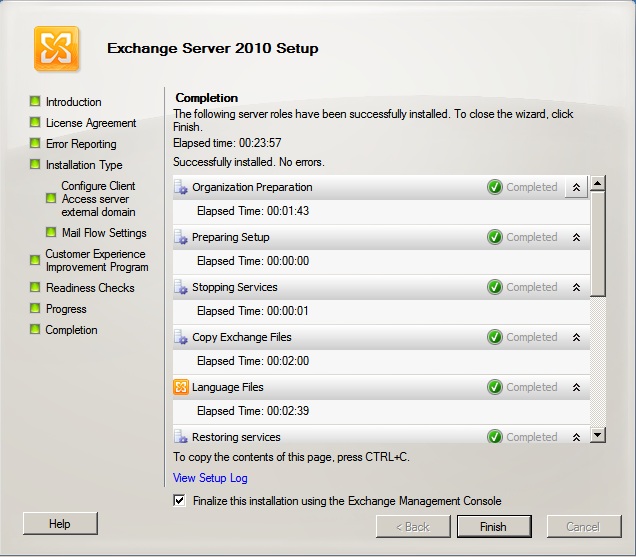
The other cautionary warning you will see on my screen capture is simply because I haven’t installed the Office Filter Pack so you will only see this if you didn’t follow the step earlier. Once you click install, the wizard will Install Exchange Server 2010. And we are looking for the screen below. All green.
Now that Exchange is installed, using the Exchange Management Console, navigate to Server Configuration > Hub Transport. Here there will be 2 Receive Connectors listed.
The one we will be dealing with is the one that starts with the word Default and is followed by the name of the Exchange 2010 server. Right click on this Receive Connector and select properties. Under the Permission Groups tab, check the box for Anonymous Users. If this box is not checked then servers sending mail to you will not be able to connect. Your e-mails with therefore be rejected.
One final task before we move on, is to reconfigure any firewall/router rules you may have for ports 25 and 443 to allow the Exchange 2010 server to now deal with SMTP traffic and Outlook Web App.
Exchange 2010 installs with a self-signed certificate by default. Whilst this will work, it will cause browser errors in the form of untrusted websites, Outlook errors for Autodiscover (which is used for free/busy information & Offline Address Book) and errors when using mobile devices and Outlook Anywhere. Whilst for the most part there are ways around these problems, I won’t be covering them in this article because my recommendation, as any other Exchange specialist would recommend, would be to use a 3rd party certificate.
Unlike earlier versions of Exchange, we have a nice easy to use wizard in the Exchange Management Console for certificate generation. This makes installing commercial certificates in Exchange 2010 much easier and less prone to error.
To start the New Exchange Certificate wizard do the following:
This will start the New Exchange Certificate Wizard
Enter a friendly name for the certificate. This can be whatever you like, but standard practice is to use the company name or something that can identify your company. Click Next
DO NOT Select to create a wildcard certificate unless you plan on buying a certificate for your entire domain, which is not required for Exchange to function. Click Next
On the following screen pull down the arrows for:
Make sure all the URLs are correct (examples can be found in my screen capture above) and then click Next.
Confirm the entries on the next page (it’s worth noting on this screen that the address shown in bold is what is known as a Common Name). This could be important later as Outlook Anywhere requires the common name to be the same as the URL used in the RPC connection. In most of my configurations I use the owa.gkvirtualdomain.co.uk as the common name. To do this, highlight the URL and click the Set as Common Name option. Click next when finished.
You then need to complete your organisation information as shown in the screen above. Then click New on the next screen. And then finish.
You can then open the file you have specified to create the request with, copy and paste the entire contents into the 3rd party vendors website and follow their instructions for submitting it.
Once you receive the signed certificate, right click on the certificate request located as above and select Complete Pending Request. Follow the instructions to import the certificate you have just received.
Now we have Exchange installed, it’s time to migrate the data over. We will start with the easy part as a bit of a break from the previous 6 steps.
To migrate the user mailboxes, open Exchange Management Console and navigate to Recipient Configuration > Mailbox. Highlight the mailboxes you want to move (the mailboxes that are on the Exchange 2003 server will appear as Legacy Mailboxes, as pictured above), right click on them and select New Local Move Request
When the New Local Move Request wizard opens, click the browse option to select the Windows 2008/Exchange 2010 server mail store and click OK, then click next.
On the following screen, select what you would like to do when the wizard encounters corrupt messages. You have two options: either to skip only the corrupt message or to skip the whole mailbox. Click next and on the following screen click New.
Once the move requests have been verified, we should see the screen above. All the mailboxes you selected should hopefully show a green tick. Please note that during the move mailbox process, the user will not have access to their mailbox as it is moved “offline”.
The next stage is to migrate the Public Folders. To do this complete the following steps on the SBS 2003 Server:
Now that we have moved the data to the Exchange 2010 server it’s best to leave this for a day or so to a) make sure all the data is moved before we perform any other Exchange related tasks. b) allow all the outlook clients to update automatically with the new server settings.
If you are using companyweb for an intranet/document storage etc. then you will also need to migrate this. If you are not using SharePoint then simply skip this step.
First thing you will need to do is to install the Windows SharePoint Services 3.0 which you downloaded as part of the pre-requisites. This is the free version of SharePoint Services. Only the version with Integrated Service Pack 2 will install on Windows 2008 R2.
Once you have downloaded Windows SharePoint Services 3.0, double click to start the installation on the Windows 2008 Server. Read, agree to and accept the license agreement and click continue. Select Basic installation. This will install the standard single site installation.
Once the installation has finished, launch the SharePoint Products and Technologies Configuration Wizard. Click next on the welcome screen and Yes to confirm you are OK with the services being restarted.
NOTE: While IIS restarts, the Outlook Web App will be temporarily unavailable.
On the final screen, check the box to 'Run the SharePoint Products and Technologies Configuration Wizard now' and click Close.
Click Next on the welcome screen and Yes to confirm you are OK with the services being restarted. The wizard will run through again and complete the configuration. Once finished click close.
Make sure you install the 32bit version on the Small Business Server and the 64bit version on the Windows 2008 server.
The next step we need to complete is to run a pre-scan on the current database to allow Windows SharePoint Service 3.0 to upgrade it when we move it to the Windows 2008 server.
Perform the following steps to achieve this:
Once you have done this still, working on the Small Business server perform the following tasks:
We now need to launch the SQL Server Management Studio Express, this can be done by:
Before we perform any additional steps, we are going to take a backup of the database used for companyweb. Follow these steps to perform a backup:
On the backup screen, the only section you need to change is the destination. Make sure the "backup to" is set to disk and then click Add.
If you receive the error message above, don’t panic, it’s easily solved by using the following procedure:
Close Regedit and try clicking the Add button again on the Backup Screen, specify a location for where you would like to save the backup and click OK.
We are now going to detach the database from the SBS 2003 server. Still in SQL Server Management Studio Express, right-click on the STS_SBSSERVERNAME_1 select tasks and then Detach.
Locate the Database and Log file, which by default will be located in C:\ Program Files\Microsoft SQL Server\MSSQL$SharePoint\Data on the Small Business Server. You need to copy the STS_SBSSERVERNAME_1.MDF and STS_SBSSERVERNAME_1_LOG.LDF files to a folder on the destination server, don’t copy them in to the SQL Server data folder.
Working on the Windows 2008 server perform the following steps:
We now need to create the website in IIS. To do this, do the following:
On the Add Web Site wizard, enter a site name of companyweb, specify a physical path and host name of companyweb as shown in the image above. You can change these if you wish, but keeping the site name/host name the same will mean the URL your clients use will not change.
Launch DNS manager from Start > Administrative Tools > DNS. Expand the forward lookup zone for your internal domain name and locate the CNAME record called companyweb. This should currently be using the Small Business Server’s server name. Double-click this record to edit it and change it to use the Windows 2008 server instead.
And then finally we need to setup SharePoint Service. To do this perform the following steps:
On the screen that appears, complete the fields as listed below. If nothing is specified, please leave the default settings.
In the IIS Web Site Section choose the following:
In the Security Configuration Section
In the Application Pool Section
In the Database Name and Authentication Section
In the Search Server Section
Click OK and your SharePoint Website will be created. Once the wizard has finished, from an Internet Browser type in http://companyweb/ and the companyweb website on the Windows 2008 server will be displayed.
Because this step is so generic and it could be different for every server, I am not going to go into specifics, only the more general steps that need to be accomplished.
The shares that are in use on the Small Business Server need to be recreated on the Windows 2008 server. One way we can do this is backup the share definitions from the Small Business Server and restore them to the Windows 2008 server. This involves working in the registry so please be careful and follow the instructions accurately. The instructions on how to do this can be found here: http://support.microsoft.com/kb/125996
The next stage is to restore the actual data to the shares. This is a lot easier if you ensure that the folder structure you have on the Small Business Server for shares is replicated on the Windows 2008 server. You can simply use Windows Backup to backup and restore the data. This will keep all permissions and ownership information intact.
You will then need to update any login scripts which will be located in \\LOCALHOST\SYSVOL on the Windows 2008 server to ensure that any mapped drives are updated.
You will also need to update any attributes that may be under the Profiles tab in Active Directory Users and Computers for the users themselves.
Hopefully you are arriving at this step a day or two after you have migrated all the mailboxes, if not then I would recommend you leave it for a day or two just to allow all client computers to automatically update the Exchange server setting in outlook. If you uninstall Exchange 2003 from the Small Business Server and this hasn’t happened then the clients will have to be changed manually.
To perform this task we will need Small Business Server 2003 CD 2, which will be asked for during the uninstallation. Before we can do this though, there are a few steps we need to perform otherwise we will not be able to uninstall it.
If you use Recipient Policies that are Manage Mailbox policies, then these will need to be removed. Likewise, if you have Recipient Policies that are used for both e-mail address definition and mailbox management, the settings defined under Mailbox Manager Settings will need to be removed. You DO NOT need to remove your e-mail address policies.
The Recipient Update Service is not used in Exchange 2010 and is therefore not required, so it can be removed. To do this you will need to use ADSI Edit. This can be done by using the following procedure:
Only delete the Recipient Update Service entries under the container; DO NOT delete the container itself or any other entries
The final step in preparation for uninstalling Exchange Server 2003 is to delete the routing group connectors that would have been created as part of the installation. I have highlighted them in the image below. Simply right click on each connector and select delete.
We are now ready to uninstall Exchange 2003. To do this, navigate to Start > Control Panel > Add or Remove Programs. From the list of installed applications, highlight Windows Small Business Server 2003 and click Change/Remove.
Click next on the Welcome screen, and next on the screen that follows. Once the component screen opens pull down the drop down next to Exchange Server and select remove, as shown below. Then click next and next again.
Caution needs to be taken when performing this next step. I would advise that ALL of the previous steps need to be completed before this is done as Small Business Server MUST hold all 5 FSMO roles.
Once you are ready, the roles can be transferred as follows. Working on the Windows 2008 server do the following:
That is 3 of the 5 roles transferred. To do the next one, which is the Domain Naming Master we need to do the following:
4 down with 1 to go. To move the Schema Master role we need to do the following:
That’s all the FSMO roles transferred from the Small Business Server. The next and final step is to demote the server from being a Domain Controller.
This is the final step of the migration process. If you have made it this far, well done! This is the easy bit!
The first thing we need to do is make sure the Small Business Server is not a Global Catalog Server. Click on Start > Administrative Tools > Active Directory Sites and Services. Locate the Small Business Server as shown in the screen shot below.
Right click on NTDS settings located under the Small Business Server and select properties. Remove the check from the Global Catalog check box and click OK. Close Active Directory Sites and Services snap-in.
The final step is to run DCPROMO. To do this, do the following:
The server will then remove Active Directory Services from the Small Business Server and it will no longer be a Domain Controller.
Once this has finished, allow the server to restart, login and then shut it down. You have now completed the migration.
If you are still with me, well done! There are a few sections of additional reading below if you would like to know some more detail about some of the processes we have just completed. There is an excellent article from EE Expert tigermatt around the purpose of the FSMO roles which you will find under the further reading section.
Move/Migrate Sharepoint Services: http://technet.microsoft.com/en-us/library/cc288664.aspx
Move last legacy Exchange Server: http://technet.microsoft.com/en-us/library/bb288905(EXCHG.80).aspx
Demystifying the Active Directory FSMO Roles by tigermatt: http://www.experts-exchange.com/articles/Software/Server_Software/File_Servers/Active_Directory/Demystifying-the-Active-Directory-FSMO-Roles.html
For this migration to work you will need the following software:
- Windows Small Business Server 2003 (SBS 2003)
- Windows 2008 Server or Windows 2008 R2 Server
- Exchange Server 2010
- Microsoft Office Filter Pack from here: http://www.microsoft.com/downloads/details.aspx?FamilyID=60c92a37-719c-4077-b5c6-cac34f4227cc&displaylang=en
- Windows SharePoint Services 3.0 with integrated Service Pack 2.Only the version with Integrated Service Pack 2 will install on Windows 2008 R2. You can download it from here: http://www.microsoft.com/downloads/details.aspx?familyid=9FB41E51-CB03-4B47-B89A-396786492CBA&displaylang=en
- Microsoft SQL Server Management Studio Express which can be downloaded from: http://www.microsoft.com/downloads/details.aspx?FamilyID=c243a5ae-4bd1-4e3d-94b8-5a0f62bf7796&displaylang=en You will need to download both the 32bit and 64bit versions
Steps required:
- 1. Health Checks on Small Business Server 2003
- 2. Join new Windows 2008 Server to the domain as a member server
- 3. Prepare Active Directory for Windows 2008 R2 Server
- 4. Make Windows 2008 R2 Server a Domain Controller of the Existing Small Business Server 2003 Domain
- 5. Transfer DHCP Service
- 6. Install Exchange 2010
- 7. Installing Exchange 2010 SSL Certificate
- 8. Migrate Exchange Data
- 9. Migrate SharePoint Services
- 10. Migrate shared user data
- 11. Uninstall Exchange 2003 from Small Business Server 2003
- 12. Transfer all 5 FSMO roles to Windows 2008 Domain Controller
- 13. DCPROMO SBS 2003 server so it is no longer a domain controller and remove from network
It’s important that the steps are followed in order as different stages make different changes to the way in which your server operates. For example you MUST make the 2008 server a domain controller before you install Exchange.
Step 1 - Health Checks on Small Business Server 2003
The absolute first thing you need to do is take a SYSTEM STATE backup of your Small Business Server as well as a full system backup. There is little chance of the data getting lost but the SYSTEM STATE backup backs up Active Directory so that if it all goes wrong we can recover it if needed.
What you then need to do on the SBS 2003 server is to make sure you have all the latest available updates. This means you should at a minimum have:
- Windows 2003 Service Pack 2
- Windows Small Business Server Service Pack 1
- Microsoft Exchange 2003 Service Pack 2
Once you have installed all of the above, run Windows Update and make sure you select the option in the blue banner bar across the top for Microsoft Update. Microsoft Update will then allow you to update all Microsoft products installed on the server providing a more comprehensive update solution. Keep running the check and installing all updates until there are no more available.
Check the health of your Active Directory by running DCDIAG, if there is anything reported as an error fix it before moving on.
Run the Small Business Server 2003 Best Practices Analyser from here: http://www.microsoft.com/downloads/details.aspx?familyid=3874527A-DE19-49BB-800F-352F3B6F2922&displaylang=en
Make sure you fix any problems the analyser identifies. If you cannot, then why not raise a question on EE to have our Experts help you?
A common problem that can cause this migration to fail is that the SBS 2003 server does not have its own IP address listed for DNS in the network properties under TCP/IP. If this is the case, update it so that it does (do not use the loopback 127.0.0.1 address).
Step 2 - Join new Windows 2008 Server to the domain as a member server
To join a Windows 2008 Server to the Small Business Server domain we need to first ensure that it is receiving a correct IP Address
Allow the Windows 2008 Server to receive a DHCP Address from your Small Business Server. Run an IPCONFIG /ALL to check this. The DNS Server entry is probably the most important. This should be configured to use the IP Address of your Small Business Server for DNS.
To test, it might be worth just pinging the SBS 2003 server from a command prompt just to check the name can be resolved by doing the following:
- Click Start > Run > type CMD and then click OK
- type PING SBS2003SERVERNAME
If you get a good response then we can try and join the 2008 server to the domain.
To Join the Server to the Domain, do the following:
- Click Start and right click on Computer and select properties
- From the screen that opens under the section called Computer name, domain, and workgroup settings click Change settings. Then click on Change
- At this point if you haven’t already specified the name of your new server you can do so
- Check the radio button next to where it says Domain and enter the domain name that the Small Business Server 2003 belongs to
- Click OK
- At which point you will be prompted for a username and password for a user that has permissions to add the computer to the domain
- Once you have added your credentials and click OK you will then be informed the server requires restarting. Please restart to resume the migration
Step 3 - Prepare Active Directory for Windows 2008 R2 Server
The first step of this process is to raise the Functional Levels of the SBS 2003 server. This involves raising the domain and forest functional level of Active Directory and the Operational mode of Exchange Server.
To raise the Domain Functional Level do the following:
- Click Start > Administrative Tools > Active Directory Users and Computers
- Right click on the domain name and select Raise Domain Functional Level
- In the drop down box select Windows Server 2003 and click OK (if this has already been done don’t worry)
To raise the Forest Functional Level do the following:
- Click Start > Administrative Tools > Active Directory Domains and Trusts
- Right click where it says Active Directory Domains and Trusts and select Raise Forest Functional Level.
And we also need to raise the Exchange Operational Mode. To do this, you need to do the following:
- Click Start > All Programs > Microsoft Exchange > System Manager
- Right click on the Organisation name right at the top of the list and select properties
- In the dialogue box check the Operational Mode, if it says Mixed Mode click the Change Mode button and say yes to the dialogue box asking if you want to change to native mode
Before we can add the Windows 2008 Server as a domain controller to the SBS 2003 domain, we need to prepare Active Directory.
To do this use the following procedure whilst working on the Small Business Server
- Insert the Windows 2008 DVD in to the Small Business Server. Ignore the autorun message that appears telling you this version is incompatible by clicking OK
- Open a command prompt (Start > Run > CMD) and run the commands below
- X:\support\adprep\adprep32 /forestprep
- X:\support\adprep\adprep32 /domainprep
- X:\support\adprep\adprep32 /domainprep /gpprep
- X:\support\adprep\adprep32 /rodcprep
Step 4 - Make Windows 2008 R2 Server a Domain Controller of the Existing Small Business Server 2003 Domain
To make the Windows 2008 Server a Domain Controller is fairly straight forward, we simply click Start > Run and type DCPROMO click OK.
This will check that the Active Directory Services Binaries are installed and if they are not, it will install them. It will then start the Active Directory Domain Services Installation Wizard.

On the first screen, there is no need to check the 'Use Advanced mode Installation' check box, just simply click next. On the operating System Compatibility screen click next.
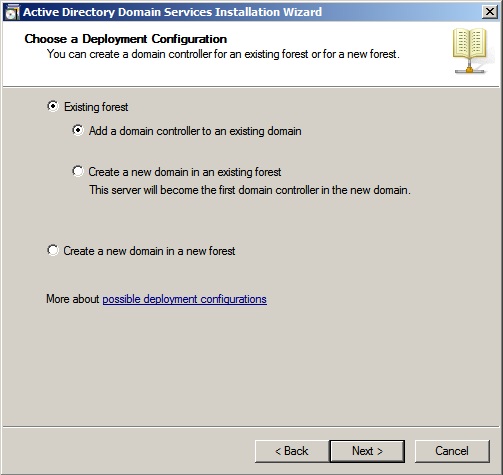
On the 'Choose a Deployment Configuration' screen, select the radio box for Existing Forest and Add a domain controller to an existing domain. Then Click next.

On the 'Network credentials' screen, the name of the domain should have been detected automatically. Check this is correct. If you are logged in as a user that has domain admin privileges then you can use the My Current logged on credentials option. If not, click the set button and add the username and password that has domain admin privileges as shown in the screen above. Click Next.
The following screen will give you the results of a domain search and ask you which domain you want to add this domain controller to. As you are upgrading Small Business Server there should only be one. Click Next.
The next screen will give you an option to select the site for the new domain controller. If you have more than one Active Directory Site ensure that you select the correct one if it hasn’t been done by default. Click next.
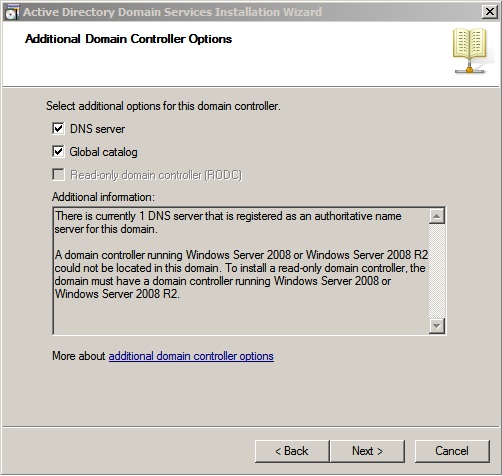
On the 'Additional Domain Controller Options' screen, make sure that both the DNS Server and the Global Catalog options are both checked. Click Next. The error message regarding DNS Delegation can safely be ignored. Click Yes on this dialog to continue.
If you have separate folders where you want to store your log files, SYSVOL share and the Active Directory database then these can be specified on the next screen. To be honest I keep them all as defaults. Once done, click Next.
On the following screen, you are asked to set a password for Directory Services Restore Mode Administrator (DSRM). Please note this is NOT the Domain Administrator password. This password is used to boot the Domain Controller into Directory Services Restore Mode which is used for recovering corrupt/deleted/failed Domain Controllers. Make a note of this password and keep it somewhere safe (in a fire safe for example).
Click Next on the following 2 screens. The wizard will then start the promotion of the server to a domain controller (I always check the box on this screen to reboot on completion - This way you can leave it and come back to it knowing that it will be ready to continue).
Once rebooted your new server will be a domain controller, DNS server and Global Catalog server in your Small Business Server Domain.
Step 5 - Transfer DHCP Service
By default the Small Business Server will be the DHCP Server (if it isn’t and you're using something else for DHCP, then you will simply need to update the DNS configuration this device is giving out so that it points to the 2008 Server instead of the 2003 Server) we will need to transfer this to the new server.
We can start this process by installing the DHCP Service.

To install DHCP, open up Server Manager and under Roles, click Add Role. From the list, select DHCP Server and click Next then next on the Introduction to DHCP Server screen.
On the network Connection Bindings screen you should have your primary IP address listed. As you will be installing Exchange on this server it’s not recommended to have a multi-homed server but if you do make sure the LAN card and IP is the only one selected. Click next.
NOTE: A multi-homed server is a server that has multiple IP addresses assigned to multiple Network Interface Cards. Normally these types of servers would be used as routers. Whilst Exchange can be made to work in this environment, it's not recommended.
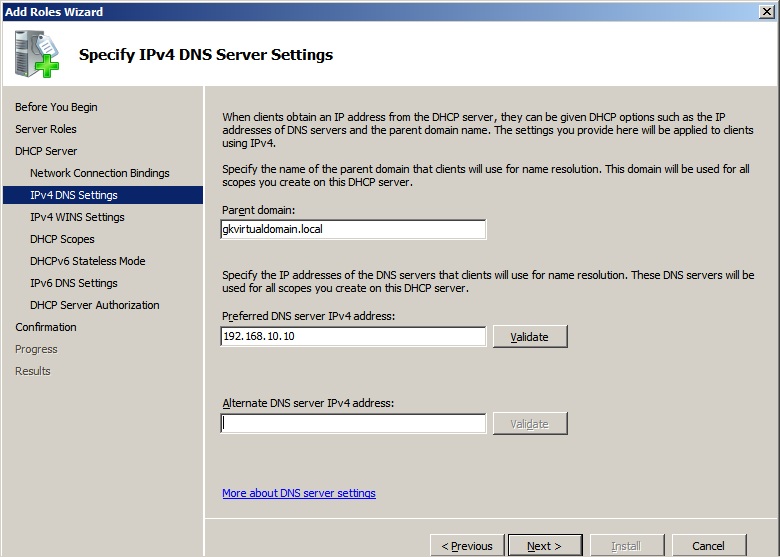
On the Specify IPv4 DNS Server Settings check the following settings:
- Check the parent domain name is correct
- Make sure that the IP Address listed for Preferred DNS server IPv4 Address is the address of the new Windows 2008 Server
- Remove any entry in the Alternate DNS Server IPv4 Settings as these will not be required
- Click next
Click next accepting the default settings on the WINS screen.
On the Add or Edit DHCP Scopes screen, click Add. This will present you with the Add Scope dialog box.
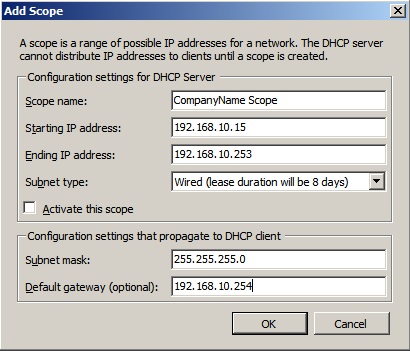
On this screen enter the following details:
- scope name
- the start IP address
- the end IP address
- Uncheck the box that says Activate this scope (we don’t want it just yet)
- The subnet mask should have been calculated automatically but if it isn’t correct then please change it to ensure it is
- Enter the default gateway; this will be the router on your network
You will notice in the scope I am creating, I have started from 192.168.10.15 this is so that I have 15 addresses that I can assign to fixed addresses. My Small Business Server and Windows 2003 server will have an address below 192.168.10.15 but I might also have printers, photocopiers, and wireless access points that also need fixed IP addresses. I have also left 192.168.10.254 available to use for my router.
Once you have completed all the details, click OK and then Next.
Accept the default setting on the 'Configure DHCPv6 Stateless Mode' and the Specify IPv6 DNS Server Settings.
On the 'Authorize DHCP Server' screen, select to use the current credentials and click Next, then Install on the confirmation screen.
The DHCP Server service is now installed on the Windows 2008 server.
Before we can switch over, we need to make some changes to the Small Business Server DHCP settings. Whilst we can just turn one off and turn the other on this will cause you to have to release and renew the settings on the client machines manually for them to pick up the new DHCP Service. The alternative is to wait the 4 days before your client machines request an IP address renewal.
To make the required changes, do the following on the Small Business Server:
- Navigate to Start > Administrative Tools > DHCP this will open the DHCP snap-in
- Right click on the Scope listed under your Small Business Server and select properties
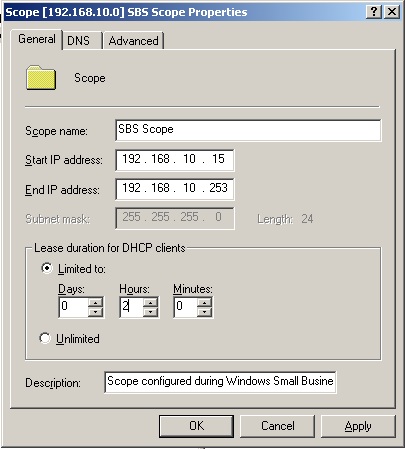
In the section titled 'Lease duration for DHCP clients' we are going to change it to 2 hours from the default of 8 days. Click OK
Then under Address Leases, highlight all DHCP Leases, right click and select delete. NOTE: If you have any reserved addresses make sure they are not highlighted otherwise they will be deleted also.
This action will cause all DHCP clients to renew their addresses and gain an address that has a 2 hour lease. Check the Address Leases and refresh until you are happy that all the clients now have an IP address. (You might want to leave this overnight just to make absolutely sure)
Once you are happy that all the clients have now got a 2 hour lease from the Windows 2008 server do the following:
- Navigate to Start > Administrative Tools > DHCP
- Expand the Windows 2008 servername and IPv4 then right click on the scope listed
- Select Activate
This will start the DHCP Service on the 2008 server and deactivate the service on the Small Business Server (this will happen automatically because when Small Business Server detects another DHCP server on the network it shuts its own down).
You will now find that in approximately 1 to 2 hours time, all your clients will start picking up IP addresses from the Windows 2008 Server.
You can now disable the DHCP Server service on the Small Business Server. DO NOT disable the DHCP Client service, as this plays a part in DNS registration.
Now that all the clients are using the new Windows 2008 Server for DHCP and DNS, we need to make sure that the Small Business Server is also using the Windows 2008 Server for DNS. To do this modify the TCP/IP properties of the network card and change the Primary DNS servers IP address to that of the Windows 2008 Server. Do not enter anything in the Secondary DNS server.
Once you have done this restart the NETLOGON service so that the DNS entries are added to the Windows 2008 DNS.
Step 6 - Install Exchange 2010
Because we performed all the diagnostic checks at the start, the installation of Exchange 2010 should be fairly straight forward. Please note that even though the installation of any version of Exchange Server on a domain controller is supported by Microsoft, it is not a recommended configuration. But since we are migrating from Small Business Server the chances are you still want to stick with a single server configuration.
The first step is to install the pre-requisites on Windows 2008 to allow the Exchange 2010 installation to complete. This can be done very easily using the Windows PowerShell.
To do this, please use the following steps:
- Click Start > All Programs > Accessories > Windows PowerShell
- Import-Module ServerManager
- Add-WindowsFeature NET-Framework,RSAT-ADDS,Web-Server,Web-Basic-Auth,Web-Windows-Auth,Web-Metabase,Web-Net-Ext,Web-Lgcy-Mgmt-Console,WAS-Process-Model,RSAT-Web-Server,Web-ISAPI-Ext,Web-Digest-Auth,Web-Dyn-Compression,NET-HTTP-Activation,RPC-Over-HTTP-Proxy –Restart
This command will install all the pre-requisites for the Mailbox, Hub Transport and Client Access roles on to the Windows 2008 Server. This will replicate what you currently have on the Small Business Server.
Once the server has restarted after the above command, launch the Windows Powershell again and run the following command:
- Set-Service NetTcpPortSharing -StartupType Automatic
This will set the Net.Tcp Port Sharing Service to Automatic instead of Manual
Install the Microsoft Office Filter Pack (which you should have downloaded earlier from the top list of required software).
Once we have done this, we need to prepare Active Directory for the Exchange 2010 installation.
Unlike previous versions, Exchange 2010 will detect if the schema updates have been done and do them if not, I prefer to see this happen.
To prepare Active Directory for Exchange 2010 we need to do the following:
- Insert the Exchange 2010 DVD in to the Windows 2008 Server
- Open a command prompt (Start > Run > CMD)
- Run D:\setup /PrepareLegacyExchangePermissions
- Run D:\setup /PrepareSchema
- There is an additional command which is: setup /PrepareAD /OrganizationName: but I am going to let the Exchange Server installation do this part
Start the Exchange installation from the DVD. On the initial splash screen that opens, click Step 3: Choose Exchange Language Options, select the appropriate option then click Step 4: Install Microsoft Exchange. The Exchange Installation Wizard will then start.
The first screen you see is the Introduction screen, click Next. Read, agree to and accept the license agreement screen.
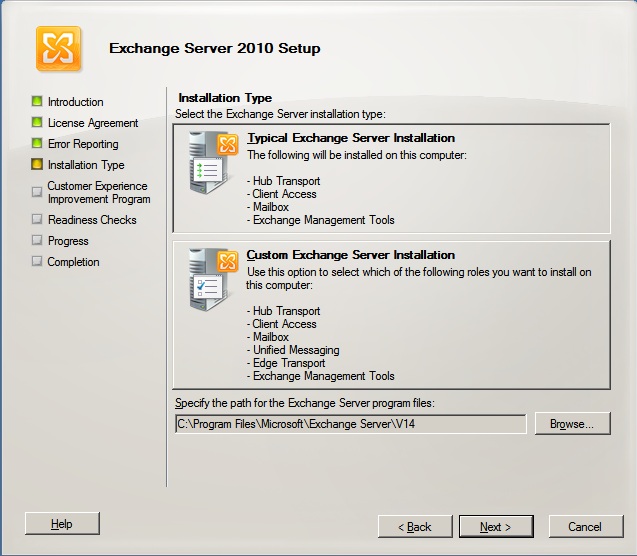
This screen allows us to choose the type of installation. As it’s assumed the Exchange 2010 server is a direct replacement for Small Business Server and all roles will be installed on a single server, we simply select Typical Exchange Server Installation and Click next.
If we were separating our roles out on to different servers we would select Custom Exchange Server Installation and then click next.
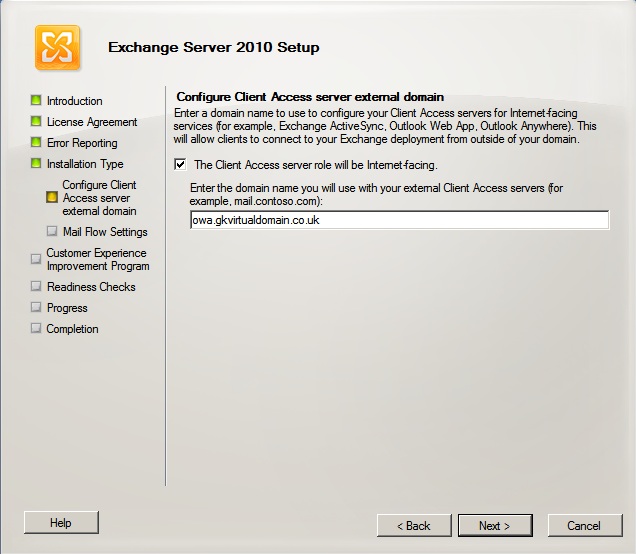
This screen allows us to specify what URL will be used for accessing our Outlook Web App from outside of the network. Whatever you put in here you will need to make sure you have a DNS A record for it in your EXTERNAL DNS server. In the later steps you will also need to use this name in your SSL Certificate Request. (CSR)
Check the box 'The Client Access role server will be internet-facing' and then specify the URL you will use, do not add https:// or anything at the end i.e. /owa. Click next.
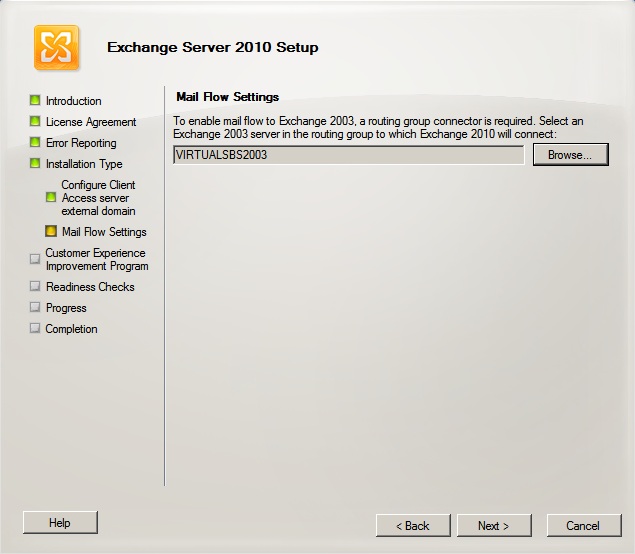
This screen is asking us to specify the Exchange 2003 server that the installation will create a routing group connector for. This is essential for mailflow between the servers. Click Browse, the list should be generated automatically and you will be able to select the Small Business Server from the list. Click OK and then next.
Choose on the next screen if you wish to participate in the Customer Improvement program and then click next. At this point the readiness checks will be performed to ensure your infrastructure is ready for Exchange 2010.

The results of the readiness check should show a warning on the Organisation Prerequisites, this is normal and it’s because we didn’t run the setup /PrepareAD /OrganizationName: command earlier on. This can safely be ignored as the setup will perform this task for us.
The other cautionary warning you will see on my screen capture is simply because I haven’t installed the Office Filter Pack so you will only see this if you didn’t follow the step earlier. Once you click install, the wizard will Install Exchange Server 2010. And we are looking for the screen below. All green.
Now that Exchange is installed, using the Exchange Management Console, navigate to Server Configuration > Hub Transport. Here there will be 2 Receive Connectors listed.
The one we will be dealing with is the one that starts with the word Default and is followed by the name of the Exchange 2010 server. Right click on this Receive Connector and select properties. Under the Permission Groups tab, check the box for Anonymous Users. If this box is not checked then servers sending mail to you will not be able to connect. Your e-mails with therefore be rejected.
One final task before we move on, is to reconfigure any firewall/router rules you may have for ports 25 and 443 to allow the Exchange 2010 server to now deal with SMTP traffic and Outlook Web App.
Step 7 - Installing Exchange 2010 SSL Certificate
Exchange 2010 installs with a self-signed certificate by default. Whilst this will work, it will cause browser errors in the form of untrusted websites, Outlook errors for Autodiscover (which is used for free/busy information & Offline Address Book) and errors when using mobile devices and Outlook Anywhere. Whilst for the most part there are ways around these problems, I won’t be covering them in this article because my recommendation, as any other Exchange specialist would recommend, would be to use a 3rd party certificate.
Unlike earlier versions of Exchange, we have a nice easy to use wizard in the Exchange Management Console for certificate generation. This makes installing commercial certificates in Exchange 2010 much easier and less prone to error.
To start the New Exchange Certificate wizard do the following:
- Click Start > All Programs > Microsoft Exchange Server 2010
- Navigate to Microsoft Exchange On-Premises > Server Configuration
- In the Actions pane click New Exchange Certificate
This will start the New Exchange Certificate Wizard
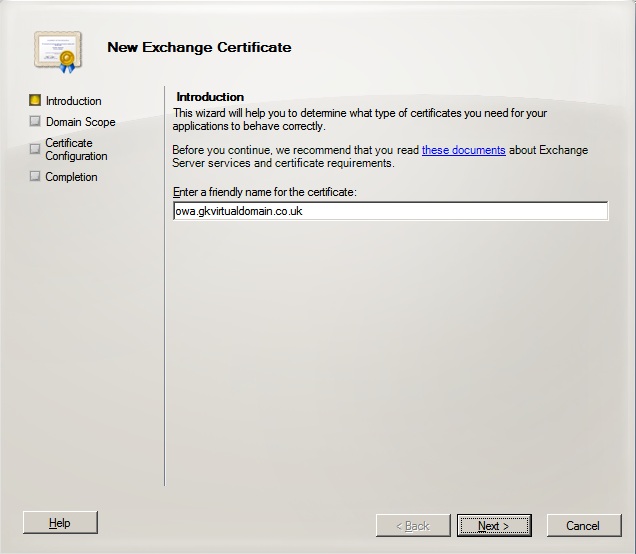
Enter a friendly name for the certificate. This can be whatever you like, but standard practice is to use the company name or something that can identify your company. Click Next
DO NOT Select to create a wildcard certificate unless you plan on buying a certificate for your entire domain, which is not required for Exchange to function. Click Next
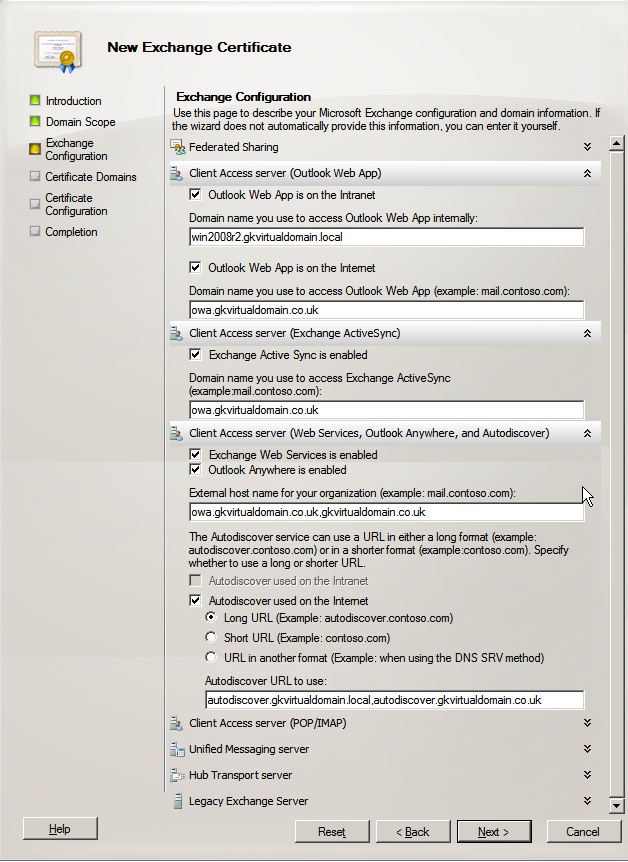
On the following screen pull down the arrows for:
- Client Access Server (Outlook Web App)
- Client Access Server (Exchange ActiveSync)
- Client Access Server (Web Services, Outlook Anywhere, and Autodiscover)
Make sure all the URLs are correct (examples can be found in my screen capture above) and then click Next.

Confirm the entries on the next page (it’s worth noting on this screen that the address shown in bold is what is known as a Common Name). This could be important later as Outlook Anywhere requires the common name to be the same as the URL used in the RPC connection. In most of my configurations I use the owa.gkvirtualdomain.co.uk as the common name. To do this, highlight the URL and click the Set as Common Name option. Click next when finished.

You then need to complete your organisation information as shown in the screen above. Then click New on the next screen. And then finish.
You can then open the file you have specified to create the request with, copy and paste the entire contents into the 3rd party vendors website and follow their instructions for submitting it.
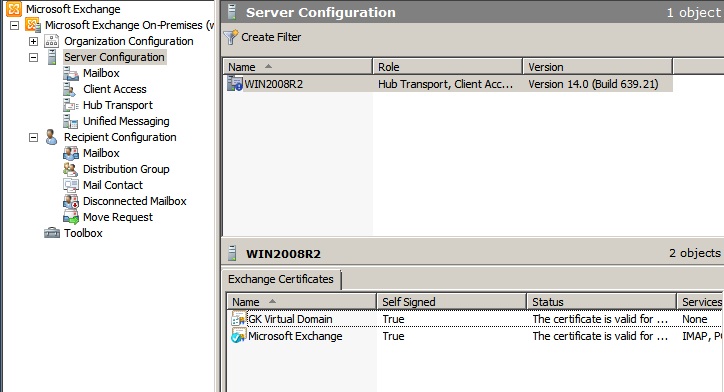
Once you receive the signed certificate, right click on the certificate request located as above and select Complete Pending Request. Follow the instructions to import the certificate you have just received.
Step 8 - Migrate Exchange Data
Now we have Exchange installed, it’s time to migrate the data over. We will start with the easy part as a bit of a break from the previous 6 steps.

To migrate the user mailboxes, open Exchange Management Console and navigate to Recipient Configuration > Mailbox. Highlight the mailboxes you want to move (the mailboxes that are on the Exchange 2003 server will appear as Legacy Mailboxes, as pictured above), right click on them and select New Local Move Request
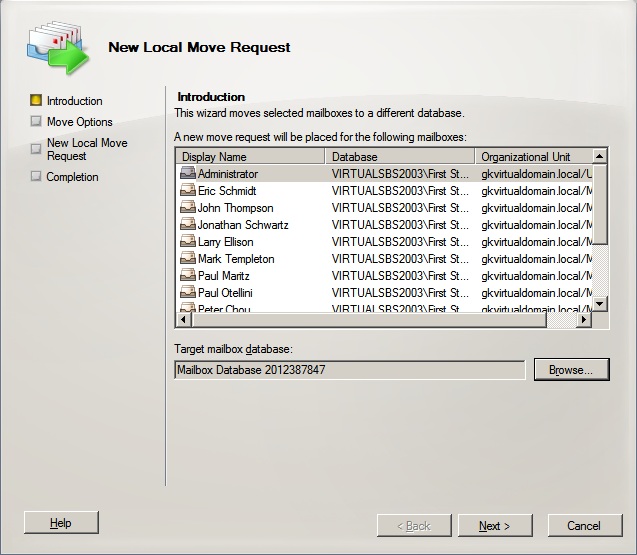
When the New Local Move Request wizard opens, click the browse option to select the Windows 2008/Exchange 2010 server mail store and click OK, then click next.
On the following screen, select what you would like to do when the wizard encounters corrupt messages. You have two options: either to skip only the corrupt message or to skip the whole mailbox. Click next and on the following screen click New.
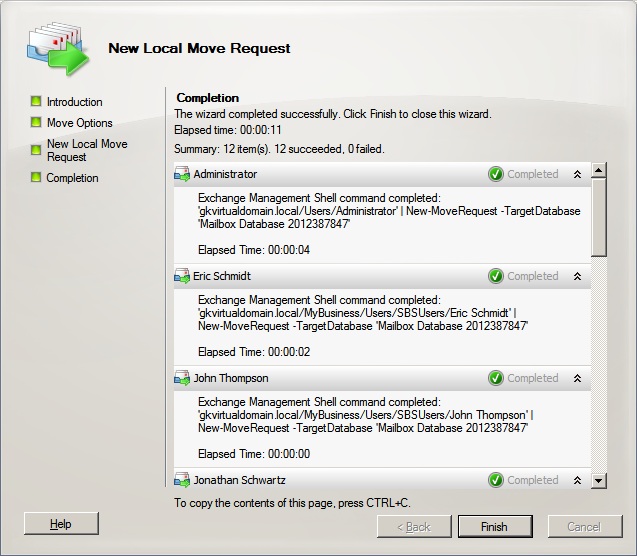
Once the move requests have been verified, we should see the screen above. All the mailboxes you selected should hopefully show a green tick. Please note that during the move mailbox process, the user will not have access to their mailbox as it is moved “offline”.
The next stage is to migrate the Public Folders. To do this complete the following steps on the SBS 2003 Server:
- Click Start > All Programs > Microsoft Exchange Server > System Manager
- Navigate to Administrative Groups > First Administrative Group > Servers > Servername > First Storage Group
- Right click on the Public Folder Store and select Move All Replicas. The only option that should appear in the list is your Exchange 2010 server. Click OK.
Now that we have moved the data to the Exchange 2010 server it’s best to leave this for a day or so to a) make sure all the data is moved before we perform any other Exchange related tasks. b) allow all the outlook clients to update automatically with the new server settings.
Step 9 - Migrate SharePoint Services
If you are using companyweb for an intranet/document storage etc. then you will also need to migrate this. If you are not using SharePoint then simply skip this step.
First thing you will need to do is to install the Windows SharePoint Services 3.0 which you downloaded as part of the pre-requisites. This is the free version of SharePoint Services. Only the version with Integrated Service Pack 2 will install on Windows 2008 R2.
Once you have downloaded Windows SharePoint Services 3.0, double click to start the installation on the Windows 2008 Server. Read, agree to and accept the license agreement and click continue. Select Basic installation. This will install the standard single site installation.
Once the installation has finished, launch the SharePoint Products and Technologies Configuration Wizard. Click next on the welcome screen and Yes to confirm you are OK with the services being restarted.
NOTE: While IIS restarts, the Outlook Web App will be temporarily unavailable.
On the final screen, check the box to 'Run the SharePoint Products and Technologies Configuration Wizard now' and click Close.
Click Next on the welcome screen and Yes to confirm you are OK with the services being restarted. The wizard will run through again and complete the configuration. Once finished click close.
Make sure you install the 32bit version on the Small Business Server and the 64bit version on the Windows 2008 server.
The next step we need to complete is to run a pre-scan on the current database to allow Windows SharePoint Service 3.0 to upgrade it when we move it to the Windows 2008 server.
Perform the following steps to achieve this:
- Copy the C:\Program Files\Common Files\Microsoft Shared\Web Server Extensions\12\Bin\prescan.exe which can be found on the Windows 2008 server to the Small Business Server. It doesn't matter where you put this
- Launch a command prompt (Start > Run > CMD)
- From the command prompt run: prescan /V http://companyweb and press enter
Once you have done this still, working on the Small Business server perform the following tasks:
- Navigate to Start > Administrative Tools > Internet Information Services (IIS)
- Navigate to servername > Web Sites and right click on companyweb and select stop
We now need to launch the SQL Server Management Studio Express, this can be done by:
- Click Start > All Programs > Microsoft SQL Server 2005 > SQL Server management Studio Express
- In the dropdown list on the connection screen, ensure that SERVERNAME\SHAREPOINT is selected and click connect
Before we perform any additional steps, we are going to take a backup of the database used for companyweb. Follow these steps to perform a backup:
- Expand the Databases folder
- Locate the database called STS_SBSSERVERNAME_1 right click on the database and select Tasks then Backup
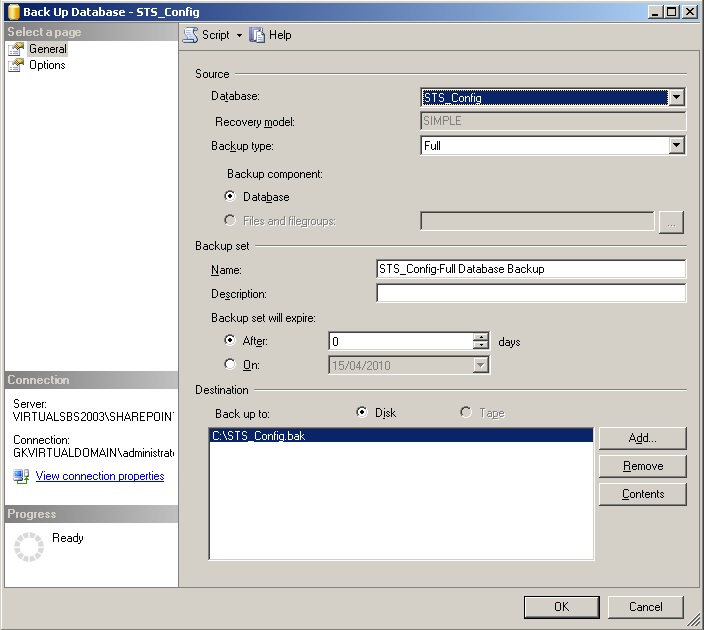
On the backup screen, the only section you need to change is the destination. Make sure the "backup to" is set to disk and then click Add.
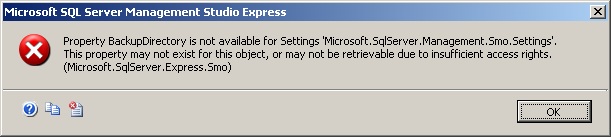
If you receive the error message above, don’t panic, it’s easily solved by using the following procedure:
- Click Start > Run > Type regedit > Click OK
- Navigate to HKEY_LOCAL_MACHINE\Software\Microsoft\Microsoft SQL Server\SharePoint\MSSQLServer
- Right click and create a new String Value called BackupDirectory
- Double click the new value to edit it and give it a value of C:
Close Regedit and try clicking the Add button again on the Backup Screen, specify a location for where you would like to save the backup and click OK.
We are now going to detach the database from the SBS 2003 server. Still in SQL Server Management Studio Express, right-click on the STS_SBSSERVERNAME_1 select tasks and then Detach.
Locate the Database and Log file, which by default will be located in C:\ Program Files\Microsoft SQL Server\MSSQL$SharePoint\Data on the Small Business Server. You need to copy the STS_SBSSERVERNAME_1.MDF and STS_SBSSERVERNAME_1_LOG.LDF files to a folder on the destination server, don’t copy them in to the SQL Server data folder.
Working on the Windows 2008 server perform the following steps:
- Navigate to Start > All Programs > Microsoft SQL Server 2005 > SQL Server Management Studio Express
- On the connection window enter \\.\pipe\mssql$microsoft##ssee\sql\query in the servername box and click connect
- Right click on Databases and click attach
- Click the Add button and select the STS_SBSSERVERNAME_1.MDF you copied from the Small Business Server earlier
We now need to create the website in IIS. To do this, do the following:
- Navigate to Start > Administrative Tools > Internet Information Services (IIS) Manager
- Expand the servername
- Right click on Sites and select New Site

On the Add Web Site wizard, enter a site name of companyweb, specify a physical path and host name of companyweb as shown in the image above. You can change these if you wish, but keeping the site name/host name the same will mean the URL your clients use will not change.
Launch DNS manager from Start > Administrative Tools > DNS. Expand the forward lookup zone for your internal domain name and locate the CNAME record called companyweb. This should currently be using the Small Business Server’s server name. Double-click this record to edit it and change it to use the Windows 2008 server instead.
And then finally we need to setup SharePoint Service. To do this perform the following steps:
- Navigate to Start > Administrative Tools > SharePoint 3.0 Central Administration
- Click Application Management
- Select Create or Extend Web Application
- On the next screen select Create a New Web Application
On the screen that appears, complete the fields as listed below. If nothing is specified, please leave the default settings.
In the IIS Web Site Section choose the following:
- Use an Existing Website and then select companyweb from the drop down list
In the Security Configuration Section
- Set Authentication Provider to NTLM
- Set Allow Anonymous to No
- Set Use Secure Socket Layers (SSL) to no
In the Application Pool Section
- Use Existing Application pool and Select companyweb from the drop down box
In the Database Name and Authentication Section
- Database Server should be set to WINDOWS2008SERVERNAME\Microsoft##SSEE (where WINDOWS2008SERVERNAME is the name of the Windows 2008 Server)
- Database Name should be set to STS_SBSSERVERNAME_1
- Database authentication should be set to Windows Authentication (recommended)
In the Search Server Section
- Pull down the drop down list and select the Windows 2008 server from the list
Click OK and your SharePoint Website will be created. Once the wizard has finished, from an Internet Browser type in http://companyweb/ and the companyweb website on the Windows 2008 server will be displayed.
Step 10 - Migrate shared user data
Because this step is so generic and it could be different for every server, I am not going to go into specifics, only the more general steps that need to be accomplished.
The shares that are in use on the Small Business Server need to be recreated on the Windows 2008 server. One way we can do this is backup the share definitions from the Small Business Server and restore them to the Windows 2008 server. This involves working in the registry so please be careful and follow the instructions accurately. The instructions on how to do this can be found here: http://support.microsoft.com/kb/125996
The next stage is to restore the actual data to the shares. This is a lot easier if you ensure that the folder structure you have on the Small Business Server for shares is replicated on the Windows 2008 server. You can simply use Windows Backup to backup and restore the data. This will keep all permissions and ownership information intact.
You will then need to update any login scripts which will be located in \\LOCALHOST\SYSVOL on the Windows 2008 server to ensure that any mapped drives are updated.
You will also need to update any attributes that may be under the Profiles tab in Active Directory Users and Computers for the users themselves.
Step 11 - Uninstall Exchange 2003 from Small Business Server 2003
Hopefully you are arriving at this step a day or two after you have migrated all the mailboxes, if not then I would recommend you leave it for a day or two just to allow all client computers to automatically update the Exchange server setting in outlook. If you uninstall Exchange 2003 from the Small Business Server and this hasn’t happened then the clients will have to be changed manually.
To perform this task we will need Small Business Server 2003 CD 2, which will be asked for during the uninstallation. Before we can do this though, there are a few steps we need to perform otherwise we will not be able to uninstall it.
If you use Recipient Policies that are Manage Mailbox policies, then these will need to be removed. Likewise, if you have Recipient Policies that are used for both e-mail address definition and mailbox management, the settings defined under Mailbox Manager Settings will need to be removed. You DO NOT need to remove your e-mail address policies.
The Recipient Update Service is not used in Exchange 2010 and is therefore not required, so it can be removed. To do this you will need to use ADSI Edit. This can be done by using the following procedure:
- click Start > Run > MMC > Click OK
- Select File then Add/Remove Snap-in
- Click Add and select ADSI Edit and click Add, then close and OK
- Right click on the ADSI Edit and select 'Connect to'. From the drop down under 'Select a well known Naming Context', select Configuration and click OK
- Expand Configuration > Services > Microsoft Exchange > Organisation Name > Address List Container > Recipient Update Services
- Right click on Recipient Update Service (Enterprise Configuration) and select Delete. There may also be a Recipient Update Service (ORGNAME) this also needs to be deleted
Only delete the Recipient Update Service entries under the container; DO NOT delete the container itself or any other entries
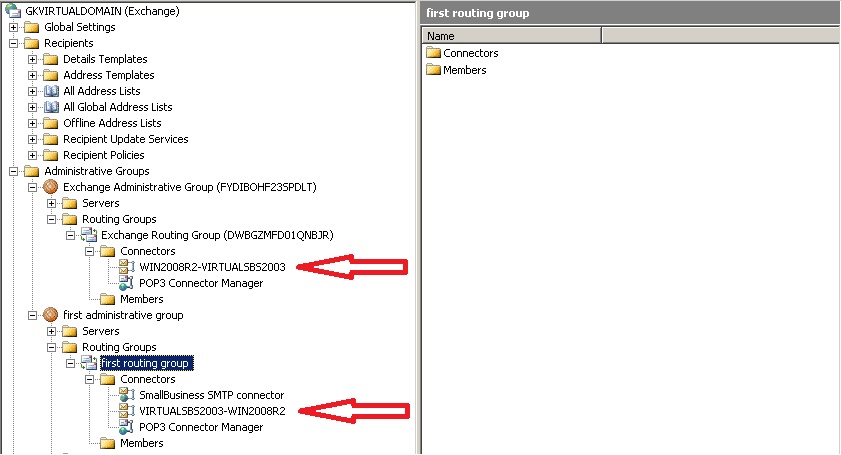
The final step in preparation for uninstalling Exchange Server 2003 is to delete the routing group connectors that would have been created as part of the installation. I have highlighted them in the image below. Simply right click on each connector and select delete.
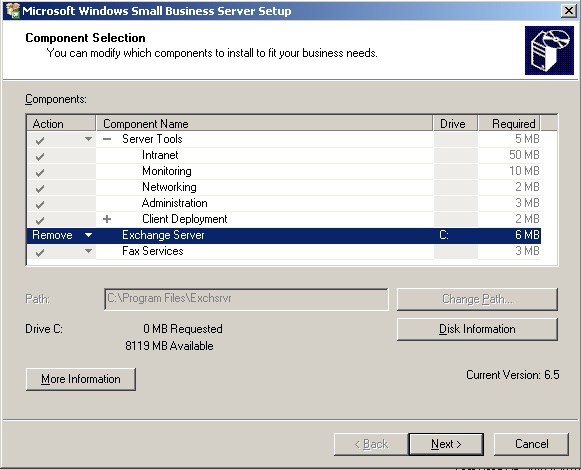
We are now ready to uninstall Exchange 2003. To do this, navigate to Start > Control Panel > Add or Remove Programs. From the list of installed applications, highlight Windows Small Business Server 2003 and click Change/Remove.
Click next on the Welcome screen, and next on the screen that follows. Once the component screen opens pull down the drop down next to Exchange Server and select remove, as shown below. Then click next and next again.
Step 12 - Transfer all 5 FSMO roles to Windows 2008 Domain Controller
Caution needs to be taken when performing this next step. I would advise that ALL of the previous steps need to be completed before this is done as Small Business Server MUST hold all 5 FSMO roles.
Once you are ready, the roles can be transferred as follows. Working on the Windows 2008 server do the following:
- Click Start > Administrative Tools > Active Directory Users and Computers
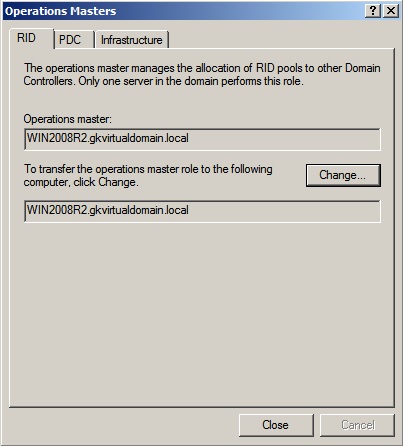
- Right click on the domain name and select Operations Masters. You will see the screen below.
- On each tab (RID, PDC & Infrastructure) click the change button.
- Accept the confirmation that you want each role to be transferred.
That is 3 of the 5 roles transferred. To do the next one, which is the Domain Naming Master we need to do the following:
- Click Start > Administrative Tools > Active Directory Domains and Trusts.
- Right click where it says Active Directory Domains and Trusts and select Operations Master.
- Once again click the Change button and say yes to the notification dialog.
4 down with 1 to go. To move the Schema Master role we need to do the following:
- Click Start > Run and type regsvr32 schmmgmt.dll
- Click OK to the confirmation
- Click Start > Run and type MMC and click OK
- Select File > Add/Remove Snap-in from the console
- From the list select Active Directory Schema, click Add
- Click Close and OK.
- Right click on Active Directory Schema and select Change Active Directory Domain Controller
- Choose the Windows 2008 Server from the list and click OK
- Click OK on the warning Dialog box.
- Right click on Active Directory Schema and select Operations Master
- Click the Change button and say yes to the notification dialog
That’s all the FSMO roles transferred from the Small Business Server. The next and final step is to demote the server from being a Domain Controller.
Step 13 - DCPROMO SBS 2003 server so it is no longer a domain controller and remove from network
This is the final step of the migration process. If you have made it this far, well done! This is the easy bit!
The first thing we need to do is make sure the Small Business Server is not a Global Catalog Server. Click on Start > Administrative Tools > Active Directory Sites and Services. Locate the Small Business Server as shown in the screen shot below.
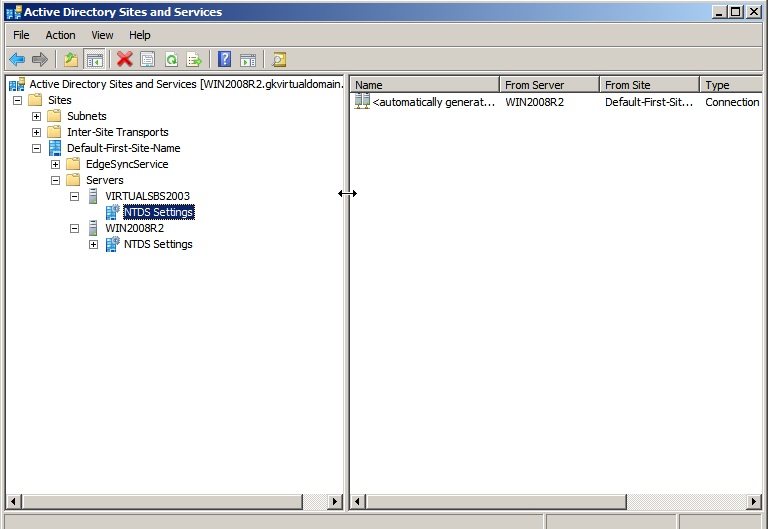
Right click on NTDS settings located under the Small Business Server and select properties. Remove the check from the Global Catalog check box and click OK. Close Active Directory Sites and Services snap-in.
The final step is to run DCPROMO. To do this, do the following:
- Click Start > Run and type DCPROMO and click OK
- Click next on the Welcome screen
- DO NOT check the box that says “This server is the last domain controller in the domain” and Click next
- Enter a new administrator password for the local administrator user and click next
The server will then remove Active Directory Services from the Small Business Server and it will no longer be a Domain Controller.
Once this has finished, allow the server to restart, login and then shut it down. You have now completed the migration.
If you are still with me, well done! There are a few sections of additional reading below if you would like to know some more detail about some of the processes we have just completed. There is an excellent article from EE Expert tigermatt around the purpose of the FSMO roles which you will find under the further reading section.
Further Reading
Move/Migrate Sharepoint Services: http://technet.microsoft.com/en-us/library/cc288664.aspx
Move last legacy Exchange Server: http://technet.microsoft.com/en-us/library/bb288905(EXCHG.80).aspx
Demystifying the Active Directory FSMO Roles by tigermatt: http://www.experts-exchange.com/articles/Software/Server_Software/File_Servers/Active_Directory/Demystifying-the-Active-Directory-FSMO-Roles.html


![[Image]](http://www.blogger.com/images/nu001.gif)
![[Image]](http://www.blogger.com/images/nu002.gif)
![[Image]](http://www.blogger.com/images/nu003.gif)
![[Image]](http://www.blogger.com/images/nu004.gif)
![[Image]](http://www.blogger.com/images/nu005.gif)
![[Image]](http://www.blogger.com/images/nu006.gif)
![[Image]](http://www.blogger.com/images/nu007.gif)
![[Image]](http://www.blogger.com/images/nu008.gif)
![[Image]](http://www.blogger.com/images/nu009.gif)


